
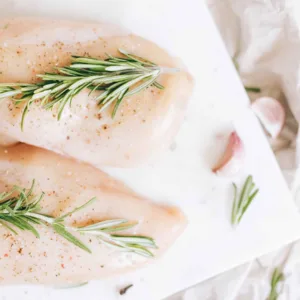
Chicken breasts are one of the most versatile pieces of meat out there. They can be used in a variety of dishes, from chicken salad to chicken pie. So knowing how-to perfectly poach chicken breast is a game changer in the kitchen.
If you’re on a mission to make healthy eating an inherent part of your lifestyle, then learning how-to perfectly poach chicken breast properly needs to be on the top of your list of skills to nail down. I say properly, because badly poached chicken can be as bad as chewing on a flip-flop. And life is far too short for flip-flop chicken!
If you've never poached chicken before, don't worry - it's ridiculously simple. Just follow these steps and you'll be poaching chicken like a pro in no time. Let’s get started!

Jump to:
? Instructions
The quickest and easiest way to cook chicken breast is by poaching it in salted water or broth. Here is how to perfectly poach your chicken breast:
- Add your chicken to a pan in a single layer and top with room temperature water or broth so that the chicken is completely covered and bring to a slow simmer.
- If you’re using water as opposed to broth, add about 1tsp salt to the cooking water for flavour.
- Once you start to see the water simmer, lower the heat all the way down, cover it, and poach for 10-15 minutes or until the chicken has reached a core temperature of 75°C or 165°F.
- I urge you not to rush the poaching by cranking up the heat too far - if you overheat the liquid and the chicken is boiled, this will result in a very tough piece of meat.
? How To Know When It's Cooked
According to the Food Standards Agency UK, food must have reached 75°C and stayed at that temperature for at least 30 seconds to kill any harmful bacteria present, making our meat safe for consumption.
Although 75°C is the standard advice for food safety, it is possible to cook food at a lower temperature provided it is cooked for longer.
The recommended time and temperature combinations are as follows:
- The food has reached 75°C and stayed at that temperature for at least 30 seconds
- The food has reached 70°C and stays at that temperature for 2 minutes
- The food has reached 65°C and stays at that temperature for 10 minutes
Cooking the chicken for the minimum amount of time while remaining safe to eat is the key to juicy and succulent chicken. Which is why a meat thermometer is a great tool to have in your kitchen drawer.
If you do not have a meat thermometer, however, simply cut through the thickest part of the meat, and check that it is no longer pink and that the juices run clear.
? Bonus Tips
- Introduce additional flavours to the chicken by adding aromatics to the liquid such as fresh or dried herbs, onion, garlic, celery, or leek.
- Reserve the leftover cooking water to make soups, sauces or to cook your gluten free grains for added flavour and even to serve with your freshly poached chicken. Store in the fridge for up to two days.
- If you’re using frozen chicken breast, be sure to thaw the chicken breast fully in the refrigerator first. This is because you do not want the outside of the chicken to be fully cooked before the core has safely cooked as this will also result in a tougher meat.
? Storage
- Either shred or slice the cooked chicken so that it can be easily stored. If slicing up, slice against the natural grain of the meat.
- Store your cooled, cooked chicken in the fridge for 2-5 days.
- I like to add frozen cooked chicken slices straight to sandwiches either the night before, or morning of the day you plan on eating them. That way they are thawed by lunchtime. This makes it so easy to make healthy lunches in a hurry.
- Alternatively, add your cooled, cooked chicken to a freezer bag being sure to lay it as flat as possible and freeze – consume within two months.

? Recipe Ideas
So now you know how to make the juiciest, most tender poached chicken of your life! The only question remains – what are you going to serve it with? Why not try some of the following suggestions:
- Serve on its own drizzled with pesto
- Add to a salad like this Healthy Coronation Chicken Salad
- Make into a pie
- Add to your favourite gluten free pasta dishes
- Add to a stir fry
- Include in a veggie omelette or frittata
- Use in a sandwich or wrap
- Add to your morning breakfast scramble
- Add to soups
- Use to make socca tacos or burritos
Did you make this recipe?
Please let me know how it turned out for you! Be sure to rate and leave a comment below, and tag @anti_candida_kitchen on Instagram with the hashtag #anticandidakitchen. Happy cooking!
How-to Perfectly Poach Chicken Breast
Ingredients
- 4 skinless boneless chicken breasts
- 1 L of cool water
- Optional aromatics:
- White onion roughly chopped
- 1 leek roughly chopped
- 1 celery stick roughly chopped
- 3 cloves garlic crushed
- 1 sprig rosemary
Instructions
- Add your chicken to a pan in a single layer and top with room temperature water or broth, and bring to a slow simmer. The chicken must be completed covered by the cooking liquid.
- If you’re using water as opposed to broth, add about 1tsp salt to the cooking water for flavour.
- Once you start to see the water simmer, lower the heat all the way down, cover it, and poach for 10-15 minutes or until the chicken has reached a core temperature of 75°C or 165°F, or until you cut through the thickest part of the meat, and the juices run clear.
- Shred or slice and store your cooled, cooked chicken in the fridge for 2-5 days. Alternatively, freeze and consume within two months.
Notes
Introduce additional aromatics to the poaching liquid such as fresh or dried herbs, onion, garlic, celery, or leek.
Last step! If you make this recipe, will you do me a huge favour and leave a ⭐⭐⭐⭐⭐ review letting me know what you thought? It really helps! Thanks for your support!!
Disclaimer: Nutritional info is approximate and for general guidance only. Unit conversions are automatically generated and may not be accurate.


Leave a Reply